-40%
Portable CMM 600 ft³ Hand Held Space Probe Measuring Machine B&S Nikon Krypton
$ 10031.47
- Description
- Size Guide
Description
Krypton Brown & SharpeK-Series Optical CMM supporting a variety of metrology applications
Suited for lab, shop and field measurements
If you search the title of this listing on youtube i did upload a video showing the unit and all parts included
15 Meter Controller to Camera cable
all parts can be shown working i am not sure how to make measurements but all items switch but i am not sure how to connect the camera will need calibration or someone with some knowledge of the item
i do have all the manuals and hand written instructions.
Single point Accuracy
Up to 60 µm
Krypton K600 six-dimensional coordinate-measuring system consists of a hand-held probe and a row of CCD (charge coupled device) cameras . Using triangulation, the cameras automatically follow the probe throughout the working envelope as the inspector touches the probe to the required points.
Because the probe is not attached to the camera module, the operator is free to move about unencumbered. The range is not limited to the length of an arm,
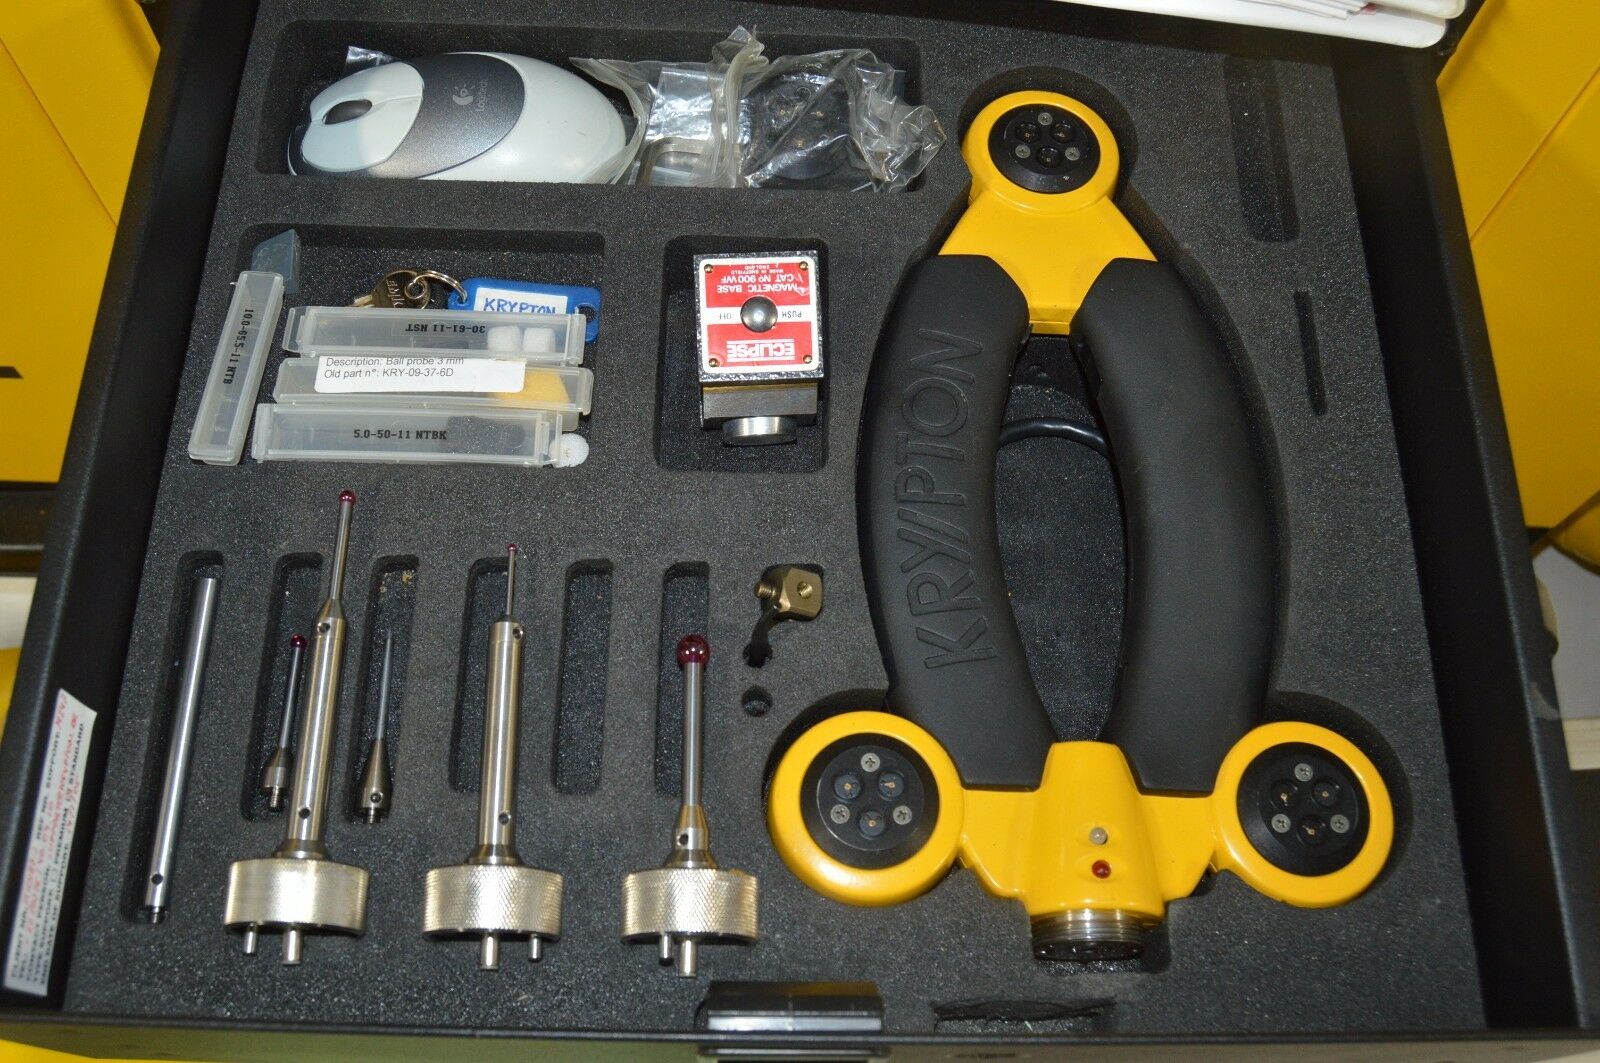
Portable Cart With Full setup PC , Monitor , Keyboard , Software + Extras in Drawers as shown (Krypton Software is already set up on PC)
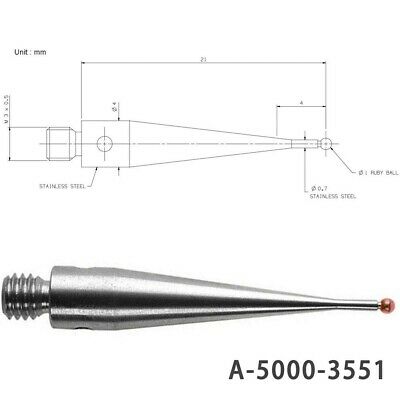
Space Probe with Multiple probes and extension to fit
STROBER/MULTIPLEXERS AND LED’S
Instruction Manuals and Notes from GM to show Setup and how to use
The K600 camera system is a 3D measurement system based on three linear CCD cameras. By triangulation the position of an infrared LED in space is calculated. This can be a static or a dynamic measurement.
Camera and Reference Bar Both Come in Robust Flight Cases
The reference bar The reference bar is a temperature-independent, carbon fiber bar, ending in two cones. When measuring the distance between these cones, and comparing them with the nominal distance, the software can estimate and compensate environment influences on the camera
The PC trolley with UPS The trolley is a rugged, steel construction with a standard 19” mounting rack. This PC trolley can hold all components of an entire system (except the camera): controller, PC, printer, small tools (styluses, Space Probe , … ). The PC trolley has a separate “cupboard” compartment to hold all cables (Space Probes cables, power cables, camera connection).
The calibration station The calibration station is a magnetic artifact, used to calibrate the Space Probe . On top, the station has three fixed spheres, or a hollow cone. By placing the Space Probe stylus onto this station, the stylus centre remains invariant while the Space Probe can freely move around. The calibration software uses this effect to calculate the stylus centre, based on the Space Probe LED positions.
measuring volumes 600 cu ft (
17 m³)
Single point Accuracy
K600:
17 m³
Up to 60 µm
15-40°C
The portable K-Series Optical CMM system forms the core of different metrology solutions. As it faces no mechanical constraints , users can freely walk around and measure points or scan surfaces as desired. The metrology area activated by the Optical CMM fits an entire vehicle and can be easily expanded. The Optical CMM is also suitable for measuring dynamic motion and researching transient events. Its third use relates to industrial robots. By tracking robot movement in real time, Optical CMM technology drives increased positional accuracy for robotized inspection and manufacturing tasks.
Key benefits:
Portable and mobile configuration offering easy setup and ergonomic operation
Full freedom measurements with walk-around SpaceProbe and K-Scan
Suited for lab, shop and field measurements
Large (17m3) and expandable measurement volume
Measurement object motion compensation through dynamic object referencing
The ergonomic SpaceProbe is used for traditional touch trigger or analog scanning measurements. Automatic tip detection supports a variety of ball and point probes and extensions.
Robust, lightweight design
Ergonomic position of trigger buttons to control measurements
Sound and LED measurement feedback
Wireless kit available
Multiple probe tip extensions for cavity measurement
Analysis in CMM-Manager or 3rd party tactile measurement software
Measurement object motion compensation through dynamic object referencing
Dynamic referencing
The initial alignment of a work piece is monitored by 3 LEDs mounted directly on the part. The camera-to-part position is constantly monitored and updated, avoiding the need for leap-frogging. As such it is possible to measure objects on vibrating workfloor or parts that move.
Optical measurements technology
K-Series cameras measure the position of infrared LEDs by means of linear CCD cameras. Through triangulation, the 3D position of each LED is calculated. 9 LEDs are built into the handheld SpaceProbe, an ergonomically device that enables an inspector to measure the actual 3D data of an inspection part in single point or scanning mode. The optical measuring CMMs are available in a portable and a mobile configuration.
Large (17m3) and expandable measurement volume
When large objects such as a bus or construction vehicle need to be measured it is possible to expand the measurement volume with the walk around reference. This dedicated option enables the customer to locate the K-600 Optical Camera 360º round the vehicle without the need for re-alignment. As such the whole vehicle can be measured with one single camera saving tremendous system costs of extra material. Because the system requires only one initial alignment, there is also an important saving of labor time.
Robotized metrology enables inline inspection and absolute Accurate Robots
Robot metrology accelerates repetitive inspection and assembly tasks. With K-Series Optical CMM, Nikon Metrology ensures that robots operate accurately and reliably all the time. Customers use the metrology system to calibrate robots up-front, or monitor one or more robots in real time to optimize robot precision. in any case precision is guaranteed, delivering predictable results all the way through.
Absolute robot accuracy through calibration or continuous robot tracking
Improved accuracy for repetitive inspection and assembly tasks
Better economics by combining metrology with industrial robots
Metrology in motion
Validating simulation models using physical prototypes and pre-series parts is a critical activity in automotive, aerospace, naval and civil engineering. K-Series DMM (Dynamic Motion Measurement) combines high-speed optical sensors and modular software applications to respond to these challenging motion analysis tasks. K-Series DMM eliminates cumbersome setup work because the sensors can be mounted and calibrated in minutes, instead of hours. The use of infrared LED markers allows for more accurate measurement of high-frequency macro motions by adding only a few grams of instrumentation mass to the test piece.
One system for static and dynamic measurements
Measure up to 1000Hz
Standalone operation with motion analysis package
Sensor operation with digital data stream to client application
Unique capability to measure multiple 3D targets (X, Y, Z)
3D animation enables to replay recorded motions in detail
Scripting enables automation of measurements and processing
Series K combines 3 CCD cameras in carbon-fiber frame with handheld Space Probe,
featuring 9 infrared LEDs, that measures parts such as sheet-metal assemblies,
dies, molds, car bodies, automotive interiors, and fixtures.
The K600 has a measuring volumes 600 cu ft, respectively. Temperature compensation utilities are included.
PC-DMIS(TM) measurement and inspection software provides analysis and reporting tools,
and adaptable shop floor user interface.
NORTH KINGSTOWN, RI-New Brown & Sharpe K Series optical coordinate measuring machines use advanced optical
triangulation technology to gather accurate dimensional data quickly and efficiently in any production environment.
Brown & Sharpe has entered a joint marketing agreement with Krypton Electronic Engineering n.v., Leuven, Belgium,
and is the exclusive North American distributor of the Krypton K Series optical CMMs.
These compact, portable measuring systems, manufactured by Krypton, combine three CCD cameras in a carbon-fiber frame
with an ergonomically designed LED-driven probing device to measure large parts, such as sheet metal assemblies, dies, molds,
car bodies, automotive interiors, and fixtures where they are located on the shop floor. The K-Series optical CMMs also offer a unique
DMM (Dynamic Measuring Machine) option allowing parts to be inspected while they are in motion.
This new technology spans the market now served by articulated-arm CMMs and laser trackers. K Series optical CMMs
provide easier set-up, fixturing and operation, while offering increased accuracy, speed of measurement and overall efficiency when compared with arms and trackers.
These shop floor measuring systems also provide more data at higher collection rates than conventional articulated-arm CMMs. By incorporating CCD cameras and LEDs,
rather than lasers, the optical CMM avoids the high cost and strict environmental issues associated with laser trackers. K Series optical CMMs also eliminate
the recurring problem of accidentally interrupting a laser beam during measurement-an action that requires the operator to begin the measurement again.
Fast, Efficient Data Capture Operators measure workpiece features using a simple handheld Space® Probe equipped with nine infrared LEDs.
The operator records dimensional data by touching the workpiece feature with the Space Probe and triggering the probe's LEDs, sending a signal back to the CCD cameras.
The data point is recorded through the process of triangulation. Using the Dynamic Referencing feature, the initial alignment of a workpiece is saved through the placement of LEDs directly on the part.
Even if the workpiece and the system are moved, the part can be automatically realigned, saving time and improving inspection throughput.
the larger , 600 cu. ft. (17 cu. meters). Additional temperature compensation utilities are included in both systems to deal with changing environments.
The K400 and K600 optical CMMs exclusively use Brown & Sharpe PC-DMIS(TM) measurement and inspection software. This comprehensive software includes a large suite of analysis and reporting tools and an adaptable shop floor user interface
It is fully compatible, through its Direct CAD Interface(TM) option, with most major CAD systems for fast, accurate part programming and reverse engineering applications.
The K Series optical CMMs are available in portable and mobile configurations. The portable configuration includes camera, controller, Space Probe, portable industrial PC and industrial camera tripod.
The mobile configuration includes a camera, an industrial mobile camera trolley, and a mobile workstation complete with pre-installed controller, PC, printer, Space Probe holder and universal power supply stabilizer.
When measuring large objects such as tractors, it’s a challenge to use traditional coordinate measuring machines (CMMs). Not only is a large and expensive CMM required, but any position change of the measurement object during the inspection measurement will result in losing the alignment. This challenge can be met by the Nikon Metrology K-Series optical CMM, a portable optical CMM that auto-aligns the measurement object by tracking reference points attached to the object.
This auto-alignment functionality obsoletes the requirement for manual and time consuming re-alignments. The K-series system comprises a camera system with 3 camera units, a hand-held SpaceProbe for touch probe measurements and a portable controller with measurement and analysis software.
The key factor in deciding to select the K-series portable system was the combination of extended measurement volume, flexibility, and both the static and dynamic capabilities of the system,” explains Product Engineering Manager Gerald Werner of John Deere tractor manufacturing. “Another important benefit is the ability to measure the prototypes directly in the workshop without having to transport them to the metrology hall. This saves a lot of time and enables us to fulfill the time-to-market requirements much faster than we could before.
In the past, measuring complete tractors was almost impossible for us. Only single parts or subcomponents of the complete vehicle were measured. The “auto-alignment” feature is an additional advantage of an articulated arm CMM and another reason for us to select a K-Series system”. By using three reference markers on the object, it is possible to measure all small movements dynamically and absolutely. The main advantages we get from the auto-alignment is that, when the tractor position changes, the initial alignment measured with the SpaceProbe is automatically updated. The auto-alignment also enables repositioning the camera system in order to measure hidden areas or to further extend the measurement volume.
The 17m3 measurement volume easily covers the cabin and a tracing or side in a single position. The ergonomic hand-held SpaceProbe allows the user to freely measure around the whole vehicle. The SpaceProbe can be equipped with long, automatically recognized touch probes for interior measurements. By relocating the camera system, the user can reach any point on the tractor while using the initial coordinate system. The portability of the K- series enables frequent position changes.
An additional advantage is that besides its application in coordinate measurement technology, the K-system is also specialized in dynamic measurements for suspension analysis or structure movement analysis, for example.
Applications
John Deere uses the K-System for R&D purposes in Product Engineering. With the SpaceProbe, the user can easily compare complex parts with virtual part data (CAD). The K-System provides fast and accurate dimensional information enabling a comparison toward the nominal data in the inspection software.
When it comes to the testing applications, the camera system can detect the smallest movements of the structure by measuring the small infrared LEDs. The dynamics software outputs functional correlations, enabling the identification of dimensional deviations as well as variations in the structure of the components.
Highly Precise
Our demand for 0.1 mm of accuracy over the measurement range is easily fulfilled by the K-system,” says Michael Biedermann of Product Engineering. The K-system is pre-calibrated and can be fine-tuned by the user at any time. Even the smallest influences (e.g. of temperature) can be compensated.
Anton Nirenberg, also from Product Engineering, places particular importance on high functionality and reliability: “Our workshop is often flooded with sun, but the K600 environment light filtering function operates perfectly.” This filtering function optimizes the applicability and robustness for measuring in all kind of industrial environments.
Production date : Dec 2003
Please See All Photos
If you have any questions or would like any extra photos please contact me
the items shown in the photos is the items you will receive
I go to the post office at everyday at 1.00pm Monday - Friday
if an item is bought and paid for before then the item will be shipped the same day
if any later it will be the next day
Items are very well packed we deal with a lot of heavy items and make sure we add extra packaging and materials to take up any free space all sharp edges protected and boxes reinforced
A place to receive friendly, reliable , full service at an affordable price. We hold each of our customers as a top priority.Our promise from our business to our customers is high standards ,quality and best prices at a fast shipping pace secured & insured!
"NO" question asked return policy!!!!
(within the 14 days of item arrival. )
Please see terms & condition policy.
Inventory
Machinist Lathe Tooling of all brands,
Gear Hobs, Lathe Chucks,
Tool holders (CAT50, CAT40, BT50, BT45, BT40, HSK, VDI, Morse Taper) ,
Capto,Kennametal ,
Bore Gage setting Rings ( 10mm - over 300mm 1/4" - 13"),
Height Stands, All types of Gages ,
Inspection Equipment and more!!!
14 Day No Hassle Returns Policy
Please subscribe to my eBay Store
For Great deals
Thank You For Viewing
